At SUGCON #NOLA I was priveledged to be able to present on how we delivered a Single Page Application Sitecore implementation - I like to call is a SPAS :)

A number of people have been asking for more information on how we did it, so here goes!
###Why a Single Page Application?
The main readon that many want a Single Page Application is that they allow us to offer a more-native-app-like experience to the user. There are also some other benefits, because only part of the page is downloaded each time, bandwidth costs can be reduced. It also allows for extra fancy bits like page transition animations etc…
###The Challenges of a Single Page Application in Sitecore
A standard SPA would generally be structured like this:
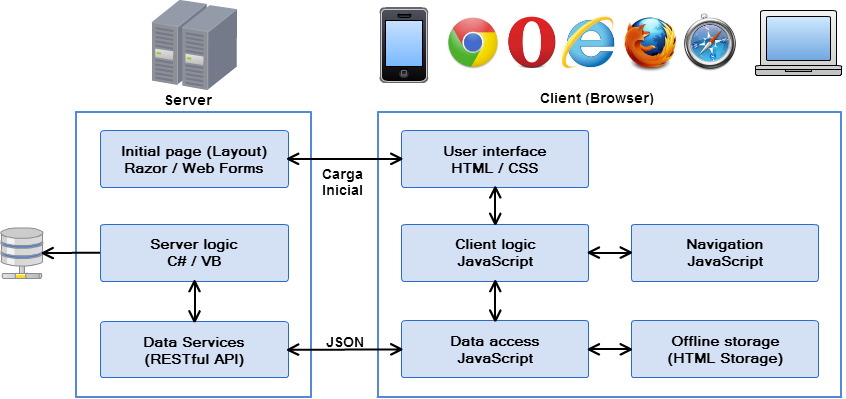
A server side API used to get the data, usually in a JSON format, no real presentation is applied. Then on the client/browser a JavaScript framework like Angular or Backbone is used to get the data from the API and present it via its templating engine.
We could do this in Sitecore, there is the ItemWebApi or we could roll out our own API, but there are a number of downsides with this approach:
- No in page editing (Experience Editor)
- No personalization
- No Sitecore Html caching on renderings
- Developers may have to learn a new framework
- Issues with older browsers - not such a big issue anymore, but could be depending on your client
###How We Can do this in Sitecore
So we needed to come up with a solution that would enable us to have a single-page application feel and benefits, but still used standard Sitecore methodologies and practices to build the site. It also needed to fully support the Experience Editor and Personalization.
Also we didn’t want to have to write a lot of custom JavaScript, there are already frameworks out there that can help, so lets use them and save time and money!
####Decision Time
For the framework we decided on backbone.js for our framework. It is nice and lightweight, simple to use and has great community support.
The next descision made was to render all the html/markup on the server. This gave us a few really quick wins. The developers were already used to writing Sitecore renderings this way, we can use Sitecore field renderers still so we get all the benefits of in page editing and personalization. We can also still use Sitecore Html Caching on the renderings.
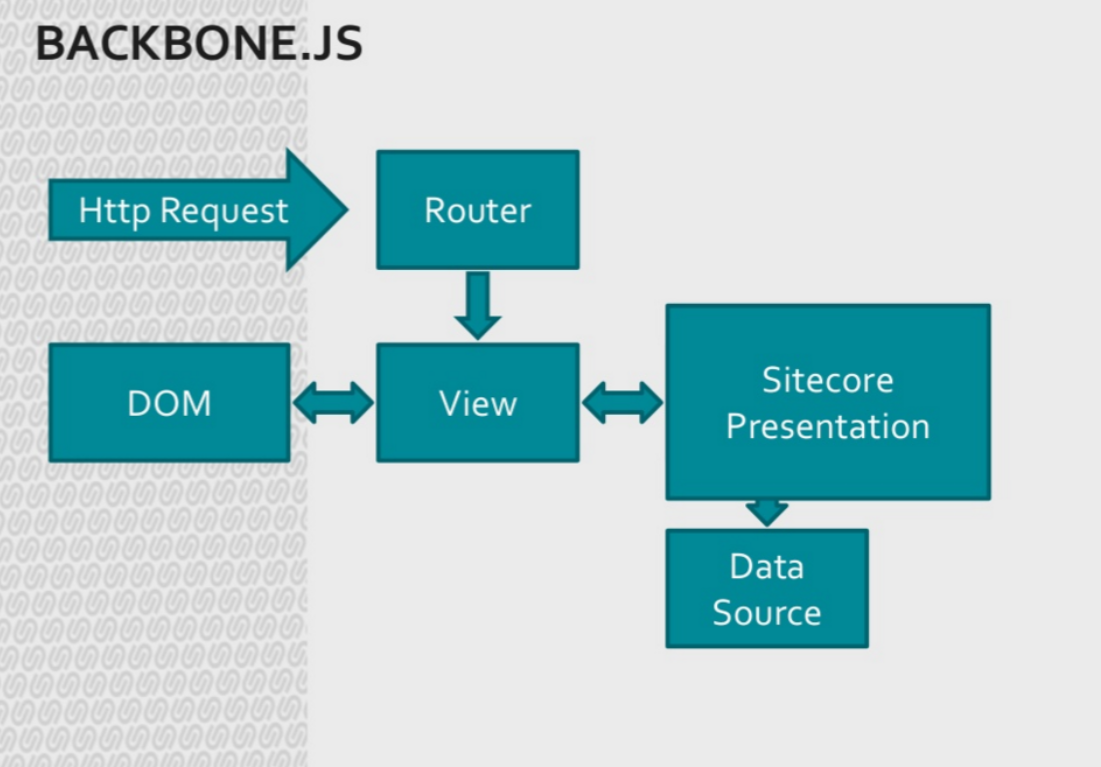
This was the flow diagram for the process:
###Devices and Views
To achive this, every page on the site needs to have 2 versions of the presentation. The default version is a standard page, built in Sitecore with all the presentation applied. It contains headers, footers, navigation and content. The second version of the page contains only the content that we want to change on the page when the user clicks a navigational element.
To do this, we simply setup a new device in Sitecore called Ajax and enabled that device when the query string was set to ajax=true
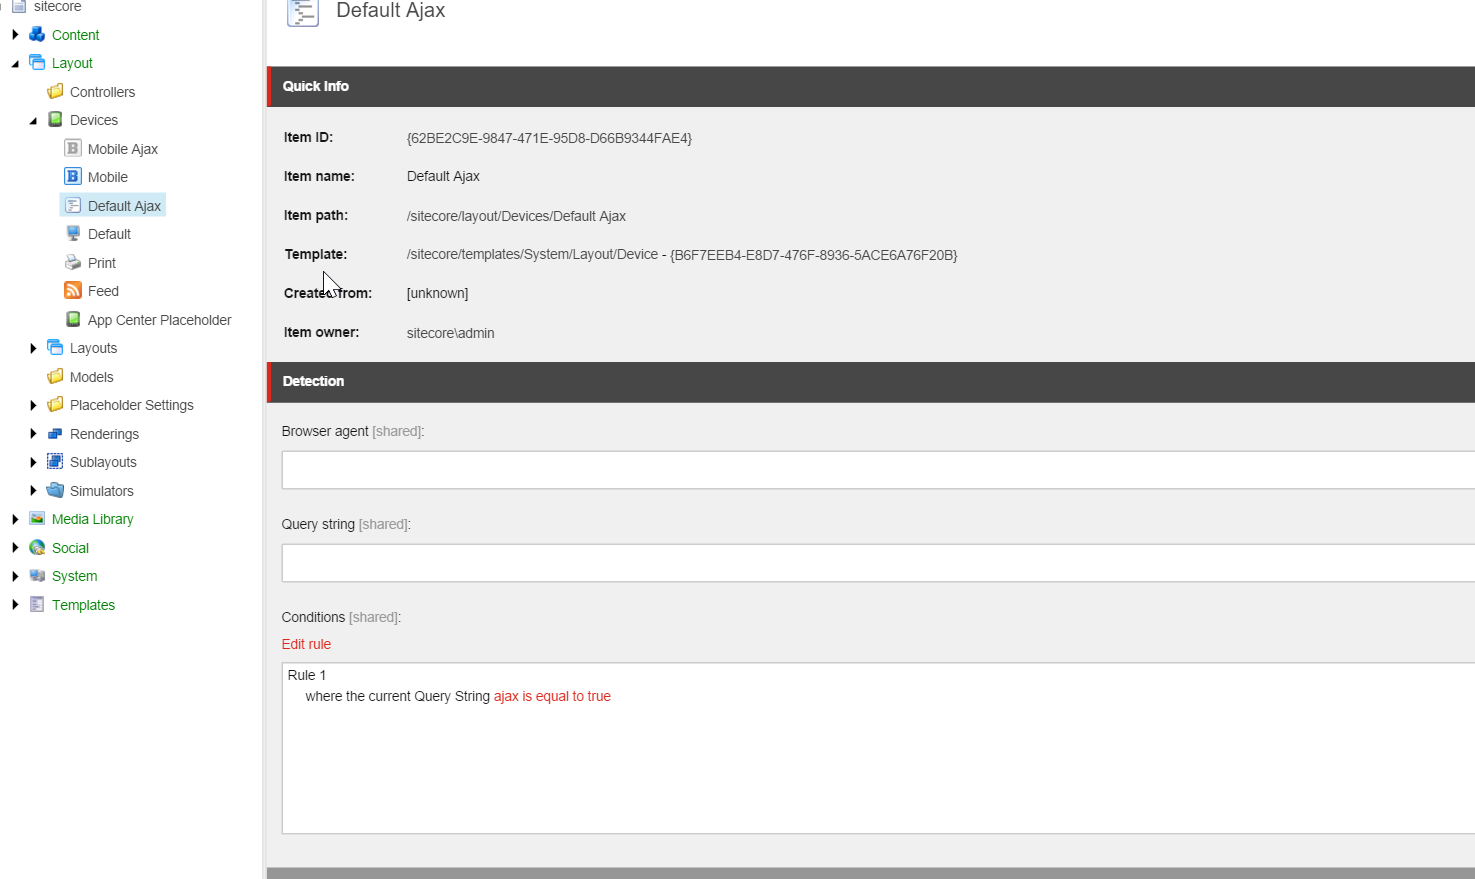
You many notice that the query string is checked via a rule, rather than the standard Query String field. This enables the query string to have multiple values and still work. It will be the subject of a later blog post.
Now we have our Device setup, we can use that query string to enable Backbone.js to load in the correct version of the page when transitioning.
###Backbone Setup
There are many excellent tutorials on how to setup Backbone, so I wont go into a lot of detail, but the basics of a backbone application are:
- Router - handles the requests and routes them to the correct view
- View - handles a specific request and renders data to the screen
- Application View - handles views in the application
First we will setup a catch all route in Backbone. This will allow us to match any url request to the backbone view. It means that the same url that is used for the direct page, can be used for the backbone/ajax version of the page:
1 | define(["jquery", "backbone"], function($, Backbone) { |
Notice that we are also tracking out page views here.
We have a base view:1
2
3
4
5
6
7
8
9
10
11
12
13
14define(["jquery", "backbone", "underscore"], function($, Backbone, _) {
var BaseView;
return BaseView = {
View: Backbone.View.extend({
initialize: function() {
return this.router = new app.Router();
},
render: function(options) {
options = options || {};
return this;
}
})
};
});
We need a main application view:1
2
3
4
5
6
7
8
9
10
11
12
13
14define(["jquery", "backbone", "views/baseView", "util/pageTransitions"], function($, Backbone, BaseView, PageTransitions) {
var AppView;
return AppView = BaseView.View.extend({
el: "#backbonePlaceholder",
navigateTo: function(view) {
var self;
self = this;
PageTransitions.get().transitionStart();
return view.render({
page: true
});
}
});
});
This view handles begining page transitions and calling the render method on the view that is passed in by the router.
Finally we have the SitecorePage view - this view handles the incoming request, makes the ajax call to our Sitecore site, loads in the result to the DOM and completes any page transition animations.1
2
3
4
5
6
7
8
9
10
11
12
13
14
15
16
17
18
19
20
21
22
23
24
25
26
27
28
29
30
31
32
33
34
35
36
37
38define(["jquery", "backbone", "views/baseView", "util/pageTransitions", "util/backboneUtil"], function($, Backbone, BaseView, PageTransitions, BackboneUtil) {
var SitecorePage;
return SitecorePage = BaseView.View.extend({
className: "main-container",
render: function() {
var hashIndex, hrefLength, linkPart, self, url, _ref;
self = this;
hrefLength = location.href.length;
linkPart = "?";
if (location.search) {
linkPart = "&";
}
if (location.hash) {
hashIndex = location.href.indexOf("#");
url = location.href.substring(0, hashIndex) + linkPart + "ajax=true" + location.href.substring(hashIndex, hrefLength);
} else {
if (location.href.indexOf('?') !== -1 && (location.search === void 0 || location.search === "")) {
linkPart = "";
}
url = location.href + linkPart + "ajax=true";
}
if ((_ref = app.ajaxRequest) != null) {
_ref.abort();
}
app.ajaxRequest = $.get(url, function(data) {
var pageTransitions;
self.router.trackPageView();
pageTransitions = PageTransitions.get();
pageTransitions.response = data;
pageTransitions.transitionEnd();
BackboneUtil.get().initializeEvents($('#mainContainer'));
BackboneUtil.get().initializeEvents($('#pageHeader'));
return BackboneUtil.get().initializeEvents($('#subNavigation'));
});
return BaseView.View.prototype.render.apply(self, arguments);
}
});
});
Notice here that we are aborting any previous ajax requests, this stops the pages loading twice if a link is double clicked, or stops wierd page loading if a user clicks on links faster than the ajax call can load them.
Well thats it for part 1, in part 2 - we will go on to look at some modifications to the presentation pipelines in Sitecore help setup the renderings and how we can turn the backbone part of the Site on or off depending on whether we are in the Experience Editor or not.
– Richard Seal

