


This is the second in a series of posts looking at how to use the Sitecore.React v2 module. If you haven’t read the first post yet, I suggest you start here: Sitecore.React - Getting Started - 1. Webpack.
All the code for this tutorial can be found here: https://github.com/GuitarRich/sitecore.react.tutorial/tree/getting-started-2.
For this second post we will look at creating React components that are going to be compatible with Sitecore.React, how we setup the main JavaScript files and also how to setup the data structure to match what will be coming from Sitecore.
Again, I will make the assumption that you already know a bit about ReactJS and the syntax involved in creating components etc… so I will not be explaining those portions of the example code.
Placeholders
Before we can start building Sitecore components with Placeholder support, we need to install the sitecore.react.placholders react module. In your console run the following:
1 | npm install sitecore.react.placeholders --save-dev |
In your package.json file, you should see this "sitecore.react.placeholders": "^2.0.0", in the devDependencies section.
We can now import placeholders into our react components. So lets create a layout.
Layouts
In Sitecore one of the first things we do is create a main layout. With a React site, our main layout in Sitecore will be slightly different, unlike a normal Mvc layout, our layout will just contain a single placeholder called app, this is where the react application will be rendered too. So we need a layout creating as a rendering where we place our main page scaffolding. So lets create a React component for that.
In our last tutorial we created our main source folders. For this tutorial we will work in the src/App folder. Create a new folder in src/App called views, then create a folder inside that one called layout.
In this folder we will create the MainLayout.jsx component. Here is the code for the main layout:
1 | import React from "react"; |
So lets break this down again. First we need to import React, once we have those we can create the React component ready to export. Now we can create the MainLayout class, for this we are using a JavaScript class and extending React.Component. Using the render() method, we can then layout our scaffolding Html. This is an example of some fairly standard markup, we will just use a bootstrap swatch for styling etc…
Now we want to add 3 placeholders, a header, body and footer. The syntax for a placeholder component looks like this:
1 | <Placeholder placeholderKey={'key'} placeholder={this.props.placeholder}> |
So lets add that to the markup above and put the placeholder keys in. Make sure you add the import line for the Placeholder component. The final component should look like this:
1 | import React from "react"; |
A couple of things to note here. First all these placeholders are standard placeholders, not dynamic ones. We can make the placeholder a dynamic one by adding the attribute isDynamic={true} to the component. Also notice that we have this attribute: placeholder={this.props.placeholder} being sent to each placeholder. This is important - without it the placeholders will not work. When being rendered by Sitecore, a prop is created called placeholder and the contents of that are sent to the component. This property contains the rendered versions of all the components assigned to the matching placeholder key in Sitecore.
For completeness this is the index.html code that I am working with - it adds in the bootstrap CSS and JavaScript:
1 |
|
One final thing to look at is the contents of the placeholder. When the application is rendered by the front end application, the Placeholder component renders any child elements as the contents of the placeholder. When rendered by Sitecore, this is ignored.
Pages
Now we have a layout, lets add a page of dummy content for the front end team. This part is only for the front end team. The page components take the place of the Sitecore items and presentation applied to them. In the next few steps we will create more components and start building the page in the same way we would build the Sitecore presentation, but for now lets just get some mark up in there and see it working.
Create the following folder: src/App/Pages, then in that folder create a page file: Home.jsx. Again, we need to import React and create a class called Home. Here is the sample code. In the render method I have just added some dummy markup:
1 | import React from "react"; |
Putting it together
So we have a layout some content for the home page, now we need to setup the React app to use that. If you have been through the first tutorial your fed.js file should look like this:
1 | global.jQuery = require('jquery'); |
Now we want to remove the Hello World part and start using the React router. Here is the sample code:
1 | global.jQuery = require('jquery'); |
Notice that we have now imported the MainLayout and Home components that we have just created. Now we can setup the React router. We are just going to use the BrowserRouter, we could also use HashRouter if we wanted too.
First lets create the main App - the app will render the MainLayout and then use the Switch component to add in the routes for the static site. For now we will just add a route for the home page and tell it to use the Home page component we created earlier. This component will be passed through to the MainLayout as {this.props.children}, that is why we added that to the main body placeholder as thats where we want it rendered in the static site.
One thing to note here is that I’m using v4 of the React Router, if you are used to using an earlier version, the syntax may seem a little differernt, that is because v4 was a complete rewrite of the router. If you are new to v4 there are some great tutorials out there. Here are a couple:
If you go to your console now and run npm run dev, then navigate to `http://localhost:8080/ in your browser you should see the page looking something like this:

One of the nice things about webpack is that it is setup for hot reloading. That means that if any changes are made to the source files, the browser will automatically reload the page for you, so stick that browser window on your other monitor and as you make the following updates, you should see the screen update for each one. Nice!
Creating Sitecore Components
So far all we have created is a single page of static content. As it stands we could not use this in a Sitecore site, so lets look at breaking the static markup into Sitecore ready components.
We will create PageTitle and PageBody components. First thing we need to do is create a folder for our components. The naming of these folders is important. Sitecore.React renderings are just modified Controller renderings, so the folder they live in should match the Controller name we are using for the action code. In Sitecore for this we will create a PageContent controler - so we need to create a PageContent folder under src/Apps/views. Once you have created that, Create 2 files PageTitle.jsx and PageBody.jsx. Again, its important to remeber that the name of the jsx file should really match our action name in the controller, so plan ahead with the naming of components with your front end team.
I wont bother breaking these down, as we have created a few components now. Here is the sample code for both components:
1 | import React from "react"; |
1 | import React from "react"; |
Now we can update the Home page to use those components intead of hard coding the markup into it. So the Home.jsx file now looks like this:
1 | import React from "react"; |
Now your browser should look exactly the same as the screenshot above, but the content is coming from the components instead of the static markup in the Home page file.
You may be thinking right now - so what, its still static markup and the PageTitle and PageBody components as they stand, still can’t be ported into Sitecore as they are. And you would be right - so the next step will be to add in the structured data part - but for that you will have to wait until the next tutorial…
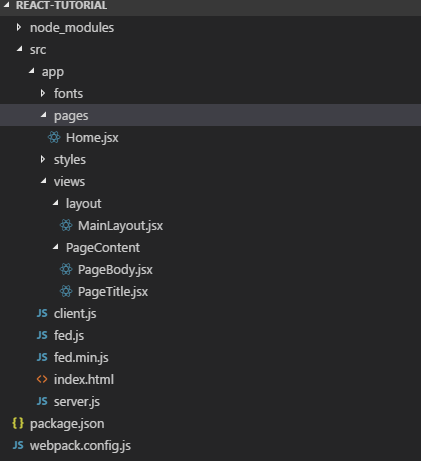
By the end of this tutorial, your project folder should look like this:
This is the second article in a series of tutorials on Sitecore.React:
- Sitecore.React - Getting Started - 1. Webpack
- Sitecore.React - Getting Started - 2. Creating Components
- Sitecore.React - Getting Started - 3. Data
If you have any questions - feel free to hit me up on Sitecore Slack - my user is @GuitarRich!